This post is part of my WordPress Essentials Toolkit — a collection of the most important basic steps to maintaining a WordPress site. Get a free copy of this helpful 28-page PDF by subscribing to my Weekly Web Tips!
One of the beautiful things about WordPress is its flexibility and extendability. The basic engine does quite a lot already, and does it well. But it doesn’t do everything.
Fortunately, we have plugins for the “everything else” part.
A plugin is simply a piece of software code that adds a function to WordPress. Makes it capable of doing something it’s not built to do. Chances are, if there’s something you’d like your blog to do, someone has written a plugin that’s perfect for you.
I’ll be reviewing specific plugins, and giving configuration instructions for them, in future posts, but today I’ll cover the process of installing a new plugin. It’s a built-in feature of WordPress, so there’s no downloading, FTP’ing, unzipping, or any of that file-wrangling at all. You just use your WordPress dashboard to find and install plugins.
Here’s the whole process, illustrated.
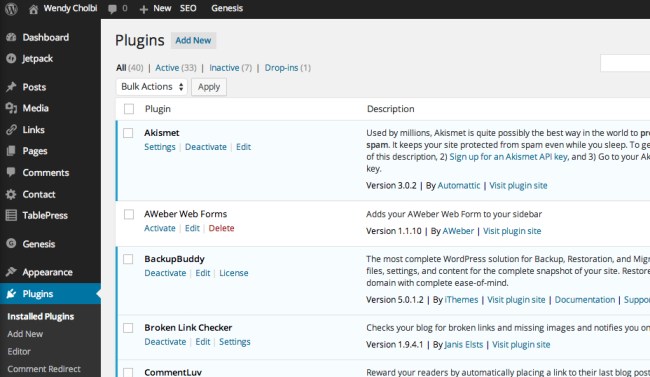
Step 1. Click on “Plugins” in the left navigation
This brings up a list of plugins you already have installed.

Step 2. Click “Add New” to bring up the search screen
It’s helpful at this stage if you know the actual name of the plugin you want to install, because a quick search will bring it right to you. But you can also search for keywords you want in your plugin, or use the tag cloud to see all plugins with a given tag.

If you do search using keywords or tags, you’ll probably want to do some research on the top search results before installing a plugin. Fortunately, the search results screen provides links to the plugin’s home page, plus (usually) a link to the plugin’s author. It also provides user ratings so you can see what’s working for other WordPress users.
Step 3: Click “Install Now” on the left for the plugin you want

Once you’ve decided to install a particular plugin, just click “Install Now.”
If you’re not quite ready to actually install a particular plugin (maybe you’re still researching various plugins), click “Details.” This brings up a popup window featuring more information about the plugin so you can read about it, and in many cases see screenshots, before you install it. This popup also has a blue button labeled “Install Now,” if your reading convinces you you’re ready.

Whether you click “Install Now” in your search results or the red “Install Now” button in the popup, the rest of the steps are the same.
Step 4: Yes, you’re sure
You’ll get a default “Are you sure?” dialog box at the top of your browser. It’s helpful if you clicked the “Install Now” link by accident — but if you clicked it on purpose, you’re sure. So click OK.

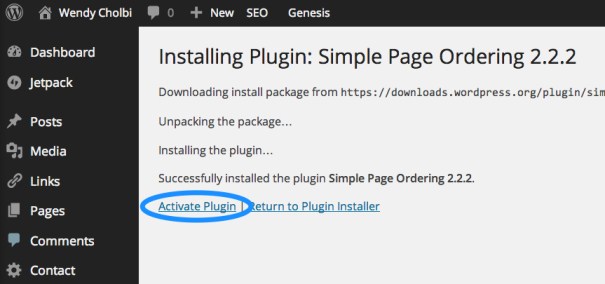
Step 5: Wait for “Activate Plugin” to appear, then click it
Three status messages will appear (usually within seconds). Only after the final “Successfully installed the plugin” message has appeared does an “Activate Plugin” link appear.
Of course, you can install plugins without activating them. If you’re not sure you want to activate it, you can navigate elsewhere or click on “Return to Plugin installer” to search for more plugins.

After you click the “Activate Plugin” link, you’ll see a status message at the top of your screen:
 At this point, some plugins will also show you messages that say things like “This plugin needs to be configured.” I’ll dive into the configuration settings for my top recommended plugins in future posts.
But for plugins that need no configuration, you’re all set. The new functions of WordPress are now active!