I recently received this question via email:
“I bought two domain names, and I want both of them to point to the same place (I want to use one of them, and have anyone who visits the second one automatically go to the first one). How do I do this?”
This setting is pretty easy to change. Any decent domain name registrar should cover this in their FAQ or help documentation — search for “domain forwarding”. Here are a few screenshots showing how to do it in a GoDaddy account.
This trick is also useful if you’ve bought both the .com and .net versions of your domain name, or if your nonprofit uses a .org address but you also want people who type the .com address to end up at the right place. I always recommend buying more than one domain.
Forwarding a domain with GoDaddy is a simple 3-step process. Ready? Here we go:
1. Log into your GoDaddy account.
You will be taken to your “My Products” screen, where you’ll see a list of your domain names (or the first five, if you own more than five).
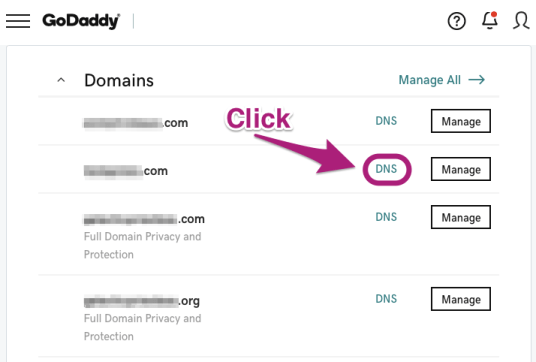
2. Click on “DNS” for the domain you want to forward.
You can also click on “Manage” and then, at the bottom of the “Domain Settings” page, click on “Manage DNS”. But it’s quicker to just click DNS from the list of domains.
Scroll to the bottom of this page, past Records and Nameservers. On the bottom right, there will be a panel labeled Forwarding, which will say “not set up” for the domain.
Click the blue ADD text next to “DOMAIN not set up”.

3. Fill in the web address of the site where you want your visitors to end up.

- Make sure that you select https:// in the first dropdown if your destination site has an SSL installed.
- Type the web address of the destination site. You can click the small blue “Preview” link to open the site in a new tab, which is a quick way to make sure that you didn’t make a typo.
- Choose whether the redirect is permanent or temporary. Most likely you’ll be choosing “permanent”. This does not affect your ability to change the forwarding again in the future — you can change it as often as you like. This setting affects how search engines will treat the redirect.
- Choose “Forward only”, so your site visitors will see the actual destination address after the forwarding happens. “Forward with masking” is just as creepy as it sounds — you would be forwarding people but their browser bar would still show the original URL, not the destination URL. This is essentially lying to your website visitors, and there is almost never a legitimate reason to do this.
- Click the blue Save button to save your changes (you can always edit or remove your forwarding later).
Semi-Interesting Note: You can type any web address here. It can be a domain name that you also own (which is the most common case), but you don’t have to own it (useful if you’d like to forward an old website to your Facebook or LinkedIn page, for instance). The address you type can be someone else’s website, or even a page at Amazon.com. GoDaddy really doesn’t care where you’re sending people.
After the changes have been saved, you should see your forwarding destination instead of that “not set up” text, with a pencil icon that you can click to edit or remove the forwarding address.

There you go! You have successfully forwarded your domain name to a different address.
Super dreamy. And easy peasy to follow. Thanks!!! One thing – when clicking the green forward button, it made me choose – Forward Domain or Forward Subdomain. I picked forward domain. And it worked!!!! Thanks, Wendy!!!
So glad it worked for you, Shelagh!
Also, thanks for pointing out the drop-down choice between Forward Domain and Forward Subdomain – you made the right selection. Sorry I didn’t mention that in my easy-peasy directions.